
Fabric Laundry Tote Tutorial
Fabric laundry totes are kind of a big deal in our home. They are perfect for the kids to carry around and they look cute. We’ve made them in miniature as they add that perfect touch of realism to tiny scenes.

What You Will Need
Pre-printed cotton canvas fabric (we’ll be using our Fabric Laundry Tote Kit)
Scissors (tailor shears and sharp-nosed Fiskars)
Liquid Fray Check (we love this one by Dritz)
Assorted fabric scraps

1. Trim around each piece.
We love using our big heavy tailor shears for the longer cuts.

2. Apply fray stop around circle edges.
There are a variety of fray stop products available, but we love this one by Dritz.
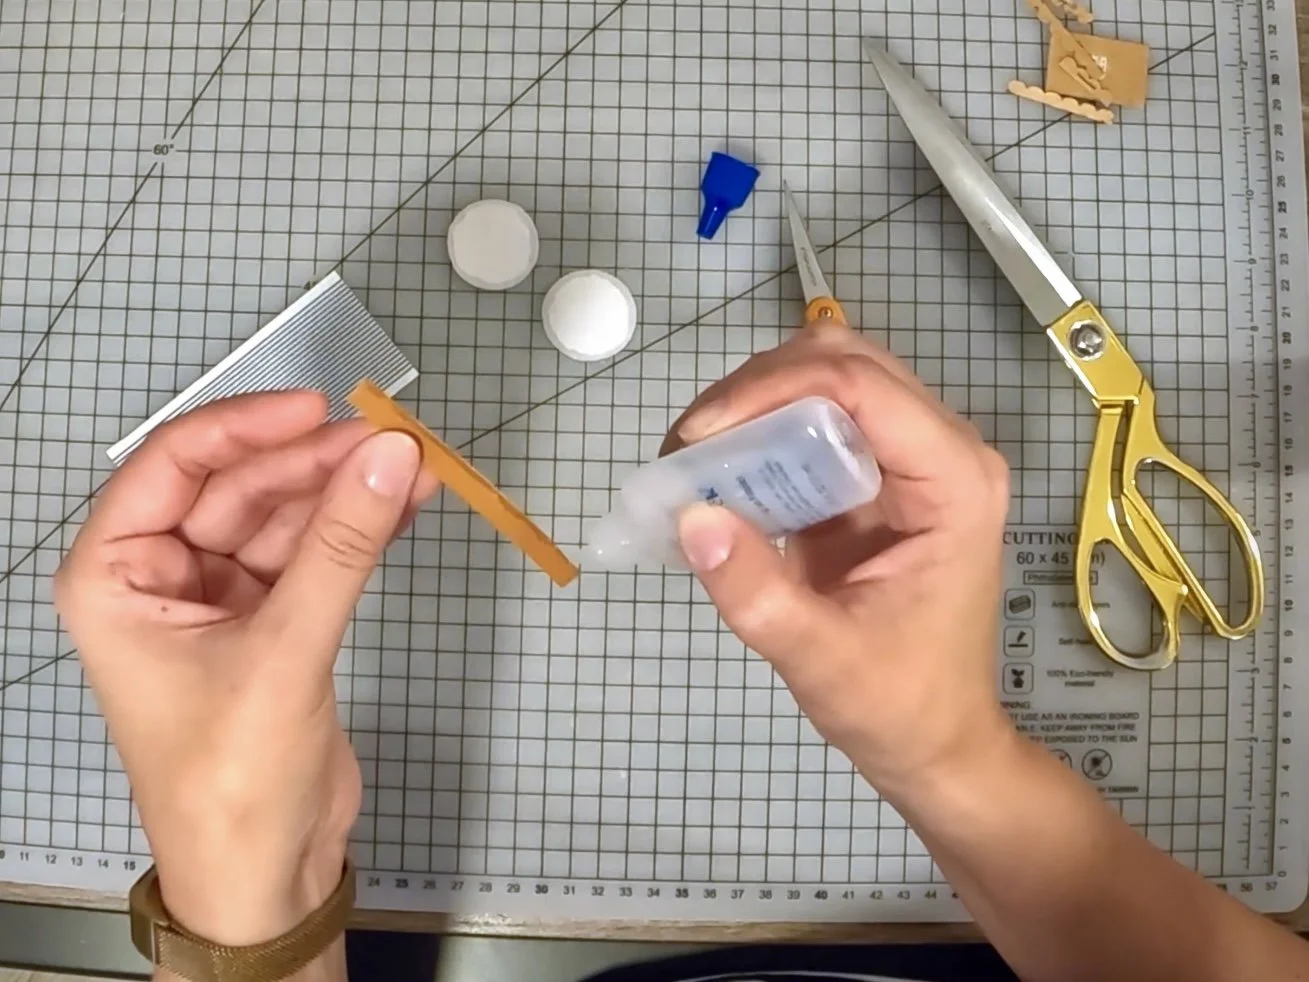
3. Apply fray stop to strap piece.
Although you could probably go around the edges, we just end up saturating the whole piece.

4. Apply fray stop to tote body edges.

5. When dry, cut notches from base.
These sharp-nosed Fiskars are perfect for the small notches.

6. Fold and crease top and base seams.

7. Apply glue to side seams.
Use your tacky craft glue of choice, just make sure it is suitable for fabric. We’re using Tacky Glue from Elmers.

8. Press sides together.

9. Fold strap in half and cut.

10. Fold each strap in thirds and crease.

11. Glue down strap edges.

12. Secure with binder clips until dry.
These little binder clips are perfect for so many miniature projects.

13. Glue interior circle to base tabs.

14. Press firmly into place.

15. Apply glue to base.

16. Add exterior circle and press.
Not necessary, but we used a small glue stick to help hold the inside.

17. Add glue inside top seam.

18. Fold down and press in place.

19. Add binder clip and dry.
Ensure that the clip is at the seam overlap.

20. Bend straps into a curve.

21. Hold shape with binder clip.

22. Glue straps to tote.

23. Secure with binder clips to dry.

And done!
Fill with scraps of fabric and place into your mini scene.


![[Featured] Home is where the heart is](https://images.squarespace-cdn.com/content/v1/595db0b044024313332d1ef8/4d709e00-3324-4310-8fc7-4e12c12235fc/westwind+1.jpg)


![[Featured] House Hunter—Mini Modern Farmhouse](https://images.squarespace-cdn.com/content/v1/595db0b044024313332d1ef8/1635368524954-RFDD3B7IPNN7OTRDWE6Y/Mini+Modern+Farmhouse+Interior+Furnished.jpg)


![[Featured] Meet the ‘cloffice’](https://images.squarespace-cdn.com/content/v1/595db0b044024313332d1ef8/1622420833320-T5FVUAYDEA0ING4B0DRO/Mini+Cloffice+Tall_Phone.jpg)


![[Featured] Making a home](https://images.squarespace-cdn.com/content/v1/595db0b044024313332d1ef8/1619784319429-U4GKIWXVW76OCOH9H4OM/Long+Farmhouse+Living+Room.JPG)

![[Featured] Instagram Identities: Jessica Cloe Miniatures](https://images.squarespace-cdn.com/content/v1/595db0b044024313332d1ef8/1619784478243-8KCI6MIDSXD6ADUM5R1T/Bayview+House+Interior.jpg)

